Homelab Part 1: Setting up the Hardware
Setting up a Raspberry Pi compute cluster involves automating repetitive tasks using Ansible. This setup includes 2 RP3s, 4 RP5s, and an MSI laptop, creating a heterogeneous Docker Swarm. Learn how I configured hardware, OS, and Docker to build a scalable, multi-architecture home lab cluster.

Setting up a compute cluster is similar to configuring any individual computer, but you need to repeat the process multiple times. As an engineer, when presented with a repetitive task, automation is the first thing that comes to mind.
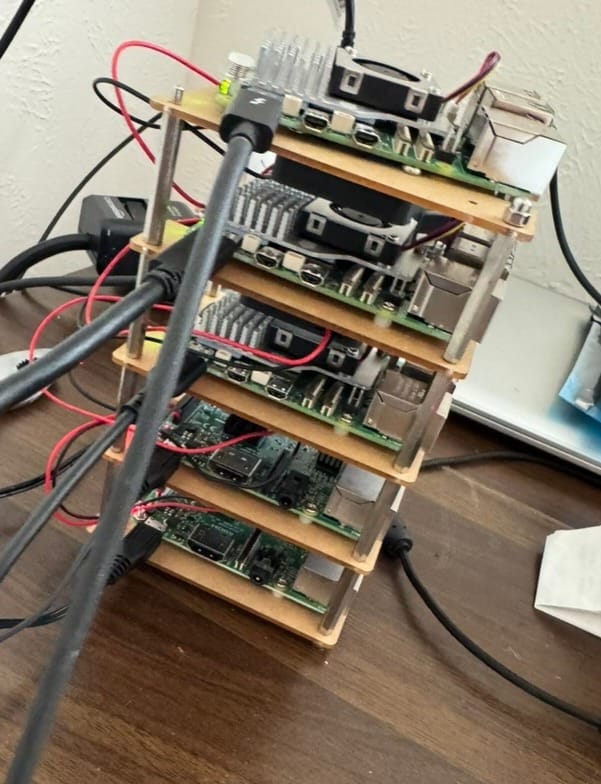
Hardware Involved
- 2x Raspberry Pi 3B
1GB RAM, BCM2837 - 4x ARM cores @ 1.2 GHz - 4x Raspberry Pi 5B
8GB RAM, BCM2712 - 4x ARM cores @ 2.4 GHz
This setup offers both advantages and challenges:
- The new RPi 5s are fast and have 8GB of RAM, making them capable of running many containers simultaneously.
- The older RPi 3s are noticeably slower, and the limited RAM means we need to carefully manage what runs on them.
Using Docker Swarm with labeled nodes, we can create a heterogeneous cluster that leverages the strengths of each type of hardware.
Operating Systems
Raspberry Pis can run various OSes, but Raspberry Pi OS is preferred for compatibility and support. The Raspberry Pi Imager Tool is excellent for setting up new Pis using an SD card reader. It allows you to pre-configure settings like:
- Hostname -
rp#- My router sets up hostname .local addresses automatically so I can access each machine by its mDNS name e.g.
rp3.local
- My router sets up hostname .local addresses automatically so I can access each machine by its mDNS name e.g.
- Wifi Credentials
- Unfortunately the RP3s only support 2.4ghz wifi so they get connected to my networks
_2_4 SSID - The RP5s support 5GHZ Wifi
- Note: A future version of this setup would use hardwired ethernet connections for each Pi, with PoE providing power as well. However, at this time the official RP5 PoE hat is not available.
- Unfortunately the RP3s only support 2.4ghz wifi so they get connected to my networks
- SSH Key
- Setting up each Pi with a copy of my main development computer's SSH public key will allow me to SSH into each node easily
- SSH will also be used in the next section with Ansibile to handle more advanced configuration
With all 6 nodes flashed and booted, I can now see them on my local network and SSH into them individually
Setting Up with Ansible
Ansible is a great tool for managing infrastructure as code. Initially, I tried manually installing Docker via SSH, but it quickly became cumbersome to replicate across multiple nodes. Using Ansible playbooks simplified this process.
There are a few things required to run Ansible playbooks on our nodes
[manager]
rp3.local

[workers]
rp1.local
rp2.local
rp4.local
rp5.local
rp6.local

[all]
rp1.local
rp2.local
rp3.local
rp4.local
rp5.local
rp6.local
inventory.ini
This file lists the IP addresses or domains of the nodes we want to talk to.
There are three groupings here
[manager]- This defines the node that we will be using as our docker swarm manager. There are specific commands we want to only run on this node
- For a simple swarm, a single manager is fine. For high-availability deployments, this should be an odd number (3/5/7/etc)
[workers]- This lists nodes that will be our workers. They join the swarm manager and containers can be distributed across them
[all]- This is a catch-all list that is used for maintenance type things like updating docker or configuring updates
Next, we can install Ansible on development machine. This could be a laptop or even another RPi, but it needs to have the same SSH key that was set on each node that we will be working with.
And then we can start writing playbooks to setup our nodes!
install_docker.yml
---
- hosts: all
  become: true
  tasks:
    - name: Ensure apt is up to date
      apt:
        update_cache: yes

    - name: Install Docker dependencies
      apt:
        name:
          - apt-transport-https
          - ca-certificates
          - curl
          - software-properties-common
        state: present

    - name: Install Docker using convenience script
      shell: curl -fsSL https://get.docker.com -o get-docker.sh && sh get-docker.sh
      args:
        executable: /bin/bash

    - name: Ensure Docker service is running
      service:
        name: docker
        state: started
        enabled: yes
This playbook sets up the basic Docker dependency we will need to build a Docker Swarm
- Updates linux dependencies
- Installs docker dependencies
- Installs Docker
- Sets up Docker to start when the Pi reboots automatically
reinitialize_swarm.yml
This playbook is called reinitalize because I wrote it after I manually set up the Docker Swarm the first time. I changed the IP address of the manager node, which required tearing down the whole swarm. This script does that teardown but also automates the setup
---
- name: Reinitialize Docker Swarm and Join Worker Nodes
  hosts: manager
  become: true
  vars:
    ansible_python_interpreter: /usr/bin/python3

  tasks:
    - name: Get manager's IP address
      ansible.builtin.setup:
        filter: ansible_default_ipv4
      register: manager_ip_info

    - name: Set manager IP fact
      set_fact:
        manager_ip: "{{ manager_ip_info.ansible_facts.ansible_default_ipv4.address }}"

    - name: Leave the swarm on manager node
      shell: docker swarm leave --force
      ignore_errors: yes

    - name: Initialize Docker Swarm on manager node
      shell: docker swarm init --advertise-addr {{ manager_ip }}
      register: swarm_init
      failed_when: "'Error' in swarm_init.stderr"

    - name: Retrieve worker join token
      shell: docker swarm join-token worker -q
      register: worker_join_token

    - name: Add worker join token and manager IP to all worker nodes
      add_host:
        name: "{{ item }}"
        worker_join_token: "{{ worker_join_token.stdout }}"
        manager_ip: "{{ manager_ip }}"
      loop: "{{ groups['workers'] }}"

- name: Join Worker Nodes to Swarm
  hosts: workers
  become: true
  vars:
    ansible_python_interpreter: /usr/bin/python3

  tasks:
    - name: Leave the swarm on worker node
      shell: docker swarm leave --force
      ignore_errors: yes

    - name: Join the swarm using the new token and manager IP
      shell: docker swarm join --token {{ hostvars[inventory_hostname]['worker_join_token'] }} {{ hostvars[inventory_hostname]['manager_ip'] }}:2377
      args:
        executable: /bin/bash

    - name: Update Docker daemon configuration with new insecure registry
      copy:
        dest: /etc/docker/daemon.json
        content: |
          {
            "insecure-registries" : ["{{ hostvars[inventory_hostname]['manager_ip'] }}:5000"]
          }
        owner: root
        group: root
        mode: '0644'

    - name: Restart Docker service to apply new registry settings
      service:
        name: docker
        state: restarted
        enabled: yes
This script is broken up into two sections and works on two different lists of our inventory.ini file.
The first step runs on the manager node and does the following
- Get the IP address of the manager node and save it for later
- Force the manager to leave the swarm
- Create a new swarm using that saved IP address
- Generate the join token to use in the next step
Now that the swarm manager is configured we need to add each worker to the swarm
- Leave the swarm if the node is already a part of the swarm
- Join the swarm with the worker_join_token and the manager ip
The next two steps are part of a debugging process with my custom registry
- I had deployed a custom docker image registry to the swarm
- Since I had no SSL, the registry was insecure. In order for the worker nodes to pull images from the custom registry, they needed the registry to be listed in the insecure-registries config.
And lastly restarting docker to apply the new settings
With that, we now have a docker swarm with 6 nodes, 1 manager, and 5 workers!